Printable PDF Handouts from OpenOffice Impress

Last week I was preparing a training course for a client, and I wanted to print the slides nicely for the attendees to refer to and make notes on etc. The slides were done, I'd talked to my friendly printers (Mailboxes etc in Leeds) and all I needed to do was generate the handouts. Which was fine until I googled for help with doing that from OpenOffice, only to find that although it has this awesome "Export to PDF" functionality for documents, slides, etc, it wasn't going to do it for handouts.

I'm an ubuntu user, and it turns out that there's a clever package called cups-pdf which installs a pretend printer, and anything you could print, you can turn into a PDF. Brilliant. I installed it with aptitude and instantly I had a printer named "PDF" which printed to a /home/lorna/PDF directory.

Did I mention I love ubuntu?

I also wanted to add a cover page to my document, before I sent the whole thing to the printers in a PDF file for them to print and bind. For this I simply created an OpenOffice document and used the usual export to PDF. By the magic of twitter, I got some great advice from EmmaJane and installed the package PDFShuffler which enabled me to combine the two documents and save the result as a PDF.

DSCF2526.JPG

By the magic of open source, I have beautiful handouts :) Printing in Linux really has come a long way, I can't thank the developers and maintainers of all those libraries enough - all I did was install two packages!

One-Step Symlink Switch

This is a trick I use when deploying websites so I thought I'd post it here for posterity. Actually, technically I stole it from someone else but for now let's pretend it's mine (thanks @__kb!)

When I deploy an application, which is almost invariably a PHP application, I like to put a whole new version of the code alongside the existing one that is in use, and when everything is in place, simply switch between the two. As an added bonus, if the sky falls in when the new version goes live, the previous version is uploaded and ready to be put back into service. In order to be able to do this, I have my document root pointing at a symlink, let's say it is called "current". (disclaimer: I have no knowledge of non-linux operating systems, this post is linux-specific)

When it is time to deploy, I place the new code onto the server, and create two new symlinks, one called "previous" which points to the same location as the "current" symlink does (bear with me) and one called "next" which points to the location of the new code. To deploy, all I need is this:

mv -fT next current

The f forces mv to overwrite the target if needs be, and the T directs mv to consider the second argument as a normal file, rather than as a directory to copy in to. The neat thing about doing it this way is that it happens in a single move, no weird results for people who manage to hit your site while you are typing the new symlink command or during the code updating. It is also just as simple to roll back from this, since you have a symlink pointing to the previously used code version.

I thought I'd share this snippet as it is a handy inclusion in deployment scripts/strategies. What are your tips for managing code deployment?

A "new" Netbook for Conferences

A couple of years ago, I attended ZendCon for the first time. At that time, the only laptop I had was a work machine weighing 5kg, and I was staying in a different hotel from the main conference - so I hastily bought pretty much the first non-ee netbook on the market (which was released about a week before my trip) and took that with me to the event. There were lots of limitations of it but I didn't have a whole lot of choice ... since then I've improved it significantly!

More than 512 MB RAM

I've now had the machine more than 18 months and I've been using it for events and keeping it by the bed pretty much ever since. However this year I'm speaking at TEK-X in Chicago and found myself wondering if I should get a new little machine to take with me. A few months back I upgraded the RAM in the machine (it had 512 MB originally!), and I came to the conclusion that actually, I didn't need to splash out for a new netbook since with a bit more memory, its pretty usable.

Bigger Battery Life

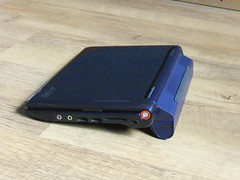
Instead of replacing the machine, I bought the extended battery for the aspireone, taking me from about 2 hours to about 6 (I think, haven't tried this battery life in anger yet). Its chunky, but not offensive:

DSCF1476

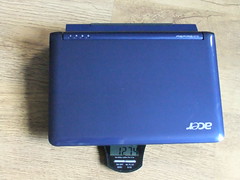
It is quite a bit heavier than the old one - my original post about getting the aspireone weighed it with its original battery at 971g and with the extended battery, its 1274g, which is still only half the weight of my current work laptop.

DSCF1480

Kubuntu Netbook Edition

Reading back to that original post about the netbook it was pretty obvious that I was hating that operating system. A couple of years ago, the support for aspireone in Ubuntu Netbook Remix became usable, and I installed that. Its been fabulous and I had no intention to do anything more than upgrade ... until someone at OggCamp showed me they had the Kubuntu Netbook edition on their netbook.

DSCF1486

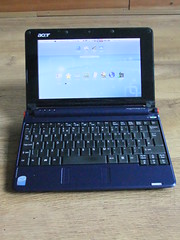
It is shiny and blue, and since I use KDE on my laptop I couldn't resist and I upgraded it with a week to go before I take it as my only machine as a speaker at a conference!

In Summary

I haven't spent a lot of money on the upgrades, the battery was about 50 GBP and the RAM came out of something else. I did have a large capacity SD card in the expansion slot since I only have 8GB hard drive. Then there was a problem with the machine suspending with the expansion slot in use and at around the same time I got a camera that takes SD ... so I put my big card into there instead :) I don't keep data on the netbook so its not an issue for me. I'll be flying to Chicago for Tek in a few days, and presenting off my netbook as usual. For a budget machine with a little bit of love and attention added in, "Merry" (short for Merope) the netbook has been quite a fabulous investment!

svn+ssh with specific identity file

Here is a quick howto on using a config file to associate an SSH connection with a particular identity file. When I ssh directly from the command line, I can specify the port, identity file to use, and a whole raft of other options. However these options aren't available when checking out from subversion using svn+ssh, and I needed to specify a particular private key to use. These instructions are for my kubuntu 9.10 installation but should work on every flavour of *nix as far as I know.

I was trying to check out using something like this:

svn co svn+ssh://lorna@svn.example.com/desired/path

To do this, I created this file: ~/.ssh/config and in it I put the following:

host lornajane
HostName svn.example.com
IdentifyFile /path/to/private_key

Now I update my checkout syntax to make use of my alias rather than specifying the host directly, like this:

svn co svn+ssh://lorna@lornajane/desired/path

SSH realises that it should pull the host information from your local config file, and uses your HostName, IdentityFile and any other settings you specify (there are many options, see this reference for more information. For example I often use this for port numbers if I'm tunnelling my SSH between places, the possibilities are endless.

Hope this helps, if you've got anything to add then I'd be delighted to see a comment from you.

Open Office Presenter Console

I've been having issues with the presenter console on both my ubuntu machines since upgrading to Karmic (9.10). One is a Thinkpad T400 running kubuntu and the other is an aspireone netbook running ubuntu netbook remix. Neither wanted had a working installation after upgrade and I couldn't get the plugin installed using the open office plugin manager.

I discovered that this plugin is now available through apitude - simply install the package openoffice.org-presenter-console and it should all work splendidly! I use the presenter console when I am speaking (which is quite often) to show the time and the upcoming slide, its a great tool.

Word Count

There's a little command line utility on *nix which I use a lot - it's wc or "word count". This is especially useful to because I live in a world where everything is plain text right up until I have to send it to someone else (and sometimes not even then). Despite its name, word count can count more than just words - it can do characters, words, lines and can tell you the length of the longest line while its at it.

Counting Lines

The biggest problem with counting lines is remembering the name of the utility, since its called "word count" and not "line count". I tend to use this for doing things like piping grep to wc and counting the lines to give me an idea of how many occurrences of something there are. I also use it to count errors in weblogs or really anything else that I could do with summarising. The syntax is something like:

grep -R TODO * | wc -l

Using a count like this is especially good for things like auditing code, where I need to know how prevalent something is - or refactoring, where I'm looking for how many of a particular pattern are outstanding. Counting lines is also very compatible with my habit of making lists in text files.

Counting Words

This is the feature that the utility was originally designed for, and as you can imagine, its pretty good at that. As with most things, this blog post started life as a text file and when I got to this point I saved it and ran:

wc -w wc_article.txt

It outputs the number of words (272) and the name of the file, which is useful if you're giving it a pattern to match.

Word Count

Its a really convenient and versatile little program; I use it often and I hope others will find it useful too.

Screen in Ubuntu Karmic

I have written about screen quite often, mostly including my .screenrc file and showing how to have named tabs for the various screen tabs you have open. When Ubuntu Jaunty came out, I found it had some quite cool enhancements that made the customisations for screen really easy by default - and I wrote about these.

In Karmic Koala, Ubuntu 9.10, the packages are still there but they've changed names! So if you want to use screen with Ubuntu Karmic or later, install packages byobu and byobu-extras, and uninstall screen-profiles and screen-profiles-extras (they were broken on my system after upgrade anyway) and you should find everything works as expected. To run screen with the new features, you should run "byobu" instead - although screen commands seem to work to detach and reattach the screens that result, weirdly.

I'm mostly posting about it because I have been very frustrated and there's no way I could have guessed, or probably ever will remember, what these packages are called. Apparently a byobu is a japanese room screen ... you learn something new every day!

Sound Issues with Kubuntu Karmic Koala

Since upgrading my work machine to karmic koala, I've noticed that my sound had stopped working. There were some broken packages in aptitude and Skype knew there was a problem as it notified me when I tried to make a call. I saw some issues reported with karmic, notably this one, so I uninstalled pulseaudio

sudo aptitude remove pulseaudio

When I restarted Skype, everything seemed to work as expected - for reference I have a thinkpad T400, if you're having the same issues, then hopefully this will help!

Customising Screen-Profile Files

I wrote a while ago about the new version of screen in Ubuntu Jaunty. Screen is an application which lets you run lots of tabs inside one terminal window, then disconnect from screen and reconnect again later. You can turn on and off a whole bunch of notifications which appear inside screen, and I also added the pink tabs I used with older versions of screen.

The tabs line is the one in the profile file which starts "caption always".

caption always "%{wk}%H%{Bk}|%{Mk}%?%-Lw%?%{km}[%n*%f %t]%?(%u)%?%{mk}%?%+Lw%? %=%{Bk}"

I also altered the "hardstatus string" line, which holds lots of placeholders, to remove the clock - I run screen on my laptop inside KDE mostly, so I already know what time it is. Annoyingly this isn't customisable via the menus but I edited my profile file to get rid of it - here's the diff

29c29
< hardstatus string '%99`%{= kw} %100`%112`%= %102`%101`%114`%115`%108`%113`%119`%117`%118`%116`%106`%104`%103`%105`%107`%Y-%m-%d %0c:%s'
---
> hardstatus string '%99`%{= kw} %100`%112`%= %102`%101`%114`%115`%108`%113`%119`%117`%118`%116`%106`%104`%103`%105`%107`'

The only thing annoying me now is that screen seems to constantly redraw itself, so Konsole thinks there is activity in that screen, when there isn't. Suggestions on stopping this or more ways you can customise your screen file are gratefully received - just add a comment!

Updating Memcached on Ubuntu Jaunty

I've been working with memcache-related things lately and ran into a problem where the library I was using just didn't seem to do what its documentation said it would. It turned out that it was making a "gets" call rather than a "get" call - and this functionality wasn't introduced to memcached until version 1.2.4. Closer inspection shows that although Ubuntu Jaunty Jackalope (9.04) is only a few months old, and memcached 1.2.4 is about 18 months old, its not included and Ubuntu versions Hardy, Intrepid and Jaunty all had 1.2.2 version of memcached.

Credit to the Ubuntu people for resolving this issue already - since memcached 1.2.8 is currently pencilled in for Karmic Koala release of Ubuntu later this year - but I can't wait that long so I updated my own memcached, it was pretty easy so here are the steps in case anyone else wants to do the same.

  1. download memcached from http://www.danga.com/memcached/download.bml
  2. check you have the dependencies you need. The only thing I didn't have was the libraries for libevent, which you can install through aptitude with aptitude install libevent-dev
  3. compile as you usually would: configure/make/make install

The final step is to get memcached running - I actually did aptitude remove memcached to get rid of my old version and stop myself from being confused later. Then to start it from command line I used:

/usr/local/bin/memcached -m 64 -p 11211 -u nobody -l 0.0.0.0

The above worked for me and allowed me to use the functionality available in the newer library (specifically I was looking to use the cas (compare and swap) functionality in the new PHP memcached extension) - it probably works on other distros too but I didn't test it, if it works for you or if you have anything to add then please leave a comment!