Blanket for Christmas

I’m currently struggling a bit with my Christmas crochet, so I’m posting here to hopefully pressurise myself into actually finishing it in time. The plan is to make a blanket for my granny for Christmas (its a surprise, I’m banking on her not learning to work the ‘net before then) and I’ve been working on this for 6 months already. It will have 36 squares and I’m currently at 24 squares and losing my way! Here it is so far:

Granny's Blanket (so far)

The spaces are the squares I haven’t made yet … I need to get a move on!

Man-fit T-shirt to Girl Top

I am sick beyond description of conference shirts, they are big and they are sack-like. I have lots of them, I’m expected to wear them a lot, and they are not particularly confidence-boosting. Dressing up for the crowd at technical events is not the way forward, but I am a tiny bit tired of shapeless – so I decided to learn how to refashion this pile of shirts that I now have, into something I might want to wear.

I began with this rather excellent tutorial, and an oversized shirt (my sister brought this back from scout camp last year).

tshirt before refashioning

I also took a favourite t-shirt that fits me nicely (not too tight, the finished article is still going to be a t-shirt) and used this as a template. Clothes that fit are pretty rare as I’m above average height, but I have a few favourites. In a nutshell, you draw around the main body of your template shirt (I used kiddy chalk, because it was handy), then make sleeves but by lining your template shirt up against the cuffs of your victim shirt.

outlines on shirt

I tacked (by hand) up the marked side seams, and tried the shirt on (inside out) to make sure it fit and I could get into it and so on (its easy to overestimate how stretchy something is and not be able to actually get into the finished article!). It was fine so I cut out along the chalk lines.

The only really tricky part came next … fitting the sleeves. In fact I had to phone home for some help (thanks mum!) and it turns out what you do is: Put the shirt down inside out and the sleeve the right way out, but post the sleeve in through the armhole with the hand-end of the sleeve inward-most – like a top with the arm inside out. Then the pins go inside this inside-out sleeve, at right angles to how you are going to sew, and with the points pointing out at you. Then you sew round the armhole and just sew over the pins with the machine. I hope that makes sense – I’m hoping it’ll remind me for next time anyway (/me points and laughs at future self reading these instructions)

Sew round the sleeves and down the sides, and take out the tacking. In theory you should also overstitch the hems but … I didn’t quite manage to wait that long before trying on my new shirt.

shirt after refashioning shirt after refashioning

Crochet Tutorial: Next Steps

If you’ve been following the previous entries in this series, you’ll have seen how to start to crochet, and if you’ve followed the instructions you should be able to add another couple of rounds onto your project and end up with something that looks like this:

granny square

There are a number of things you can do with these little squares. They’re a very traditional form of crochet (and a really good way of using up odds and ends), you can see the kind of thing I mean if you search for “granny square” on flickr. When I was first learning to crochet I made myself a coding blanket that I still love!

granny squares blanket

Crochet doesn’t have to be square and it doesn’t have to be traditional – I’ve seen everything from the subversive (crochet covers on parking meters) to the cute (amigurumi). I’m currently working on (currently in the sense that I’ve begun and I haven’t finished yet, rather than it being truly ongoing) a set of hexagonal string coasters. The idea is that they will tesselate and form either a big placemat to put hot pots on or several smaller cup-sized coasters. They’re not radical, but they’re not really your traditional granny square either!

granny hexagon string coasters

I’m sure there are many more uses of crochet in general and granny squares in particular – answers in the comments please :)

3-minute Crafty Earring Tidy

Recently I was shopping for an embriodery hoop and I saw that you can buy ones which are ready-made picture frames, you literally put the fabric in, embrioder, then trim off the outside and tidy up the back. I decided that this would make a great basis for an earring tidy – I try to keep my earrings linked together in pairs, but it depends what kind of butterfly they have and whether I remember! Some days its a real challenge to find a matching pair at all, and looking for a particular pair of earrings is usually a waste of time.

Enter the earring tidy, my 3-minute craft project! Take some fabric ( mine is linen, so its easy to put the earrings through ), put into the hoop, trim. Now add earrings!

earring tidy

It would be cool to categorise earrings and embroider in some outlines and labels, but I didn’t bother. This now hangs by my mirror on a piece of string so I can pick it up and get the earrings easily.

Crochet Tutorial: Granny Square Round 2

Here’s the last in the crochet tutorial series, showing how to fit a second round of granny square onto the existing “granny’s daughter” that we made previously. I’ll have to take some photos of stuff I’ve done with this pattern to give you some ideas of what can actually be made from this very simple pattern piece. Anyway, enough waffle, here’s the video:

If you get this far – definitely let me know :)

Laceweight Purple Mohair

I am a habitual chunky-yarn knitter. I will go all the way down to double knit weight, but beyond that I find life is too short to bother :) The upshot of this is that my projects get very big very quickly. I have a few trips coming up where I have long flights, and basically with an 18 hour travel time, I can knit about one hand-lugged-sized quantity of wool!! So I’ve been looking for something more portable to take as my project.

I’ve got this laceweight mohair from http://www.thenaturaldyestudio.com/ and its absolutely gorgeous. The pattern calls for Rohan Kidsilk Haze, which I know is lovely but it really is quite pricey.

laceweight mohair laceweight mohair - in a ball

One of the skeins (I have three!) was wound into a ball by friends when I took it to the knitting group, its 400 yards per skein so I can’t imagine I’m going to manage to crochet all that while I’m away.

The pattern is “Beaded Cobweb Wrap” from Erica Knight’s Essential Crochet, uses a 6mm hook so the pattern is more space than yarn anyway, and it looks quite easy once you’ve done the cast on – its crocheted longways, so there’s a mad long chain that you have to hook into to start with, something I always struggle with. I’ve been assured it’ll look like chewed string until I block it and that I should just carry on regardless – I’ll let you know how I get on :)

Crochet Tutorial: Granny Square Round 1

New crochet lesson, and today it really gets interesting! I decided to film the whole row to show you but flickr only allows 90 seconds playback so its in 2 halves :)

Any questions, please feel free to comment here or contact me for help! It does go by quite quickly so do pause and re-watch as needed. And don’t be discouraged if the end result is a bit lop-sided – the aim is to have the foundation ring you started with in the middle, and 4 distinct holes around it. Anything better is a bonus but entirely optional :)

The Wool Shop, Leeds

There’s been a wool shop on Tong Road in Leeds for years, and its always been pretty good. Last year I heard it was closing, the lady who ran it was retiring. To cut a very long story short, it hasn’t closed!!

I’ve been in to inspect and its had a real clean-up, new paint, carpet, better lighting – but its got the same good choice of wools and vast quantities of things being produced from the back room :) Its the same “go and ask at the counter” format but the new owners are nice and enthusiastic and quickly becoming experienced knitters themselves. I dropped in for something and was there for easily 20 minutes! The details are:

The Wool Shop
Whingate Junction
Tong Road
Leeds
LS12 4NQ

Tel: 0113 263 8383

Its on the main bus route, and is easy to park.

Opening hours:
10:30am to 5pm, Monday to Saturday – but they run another mail order business from the premises and are often there much later on, so give them a ring if you want to pop in after 5pm.

Acer Aspire One (and cosy)

I can’t remember another post which was in both the “tech” and “craft” categories – so no complaints from either camp please! Last week I became the new owner of an acer aspire one netbook/ultra mobile PC. Its little, blue, and very cute! If you want to skip the tech bit and read about the cosy I made, click here.

aspire startup screen

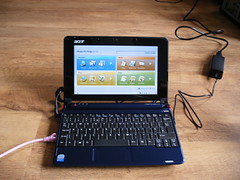
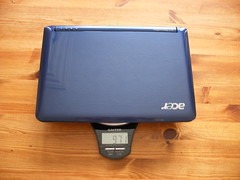
The hardware isn’t the best in its class, but it isn’t the most expensive machine either. It has 512MB RAM, 8GB hard drive (solid state drive), it measures 8.9 inches and weighs just 971g.

acer aspire on scales

The default OS for the linux version is something called “Linpus Lite”, which is a kind of toddler fedora as far as I can tell. I’m a long-term linux user and I found the locked-down-ness and the limited interface quite difficult to get started with. However with some help from this nice walkthrough plus some tips from the aspireoneuser.com forums I managed to get root access, turn on the xfce right-click menu and add a menu to the panel, install Opera and Skype and customise the main menu screens. Oh and have multiple desktops, which I like.

Its great for reading feeds, email, chat, and so on, and that’s probably all I’ll use it for. Since I often develop on a dev machine over vim + ssh, I might develop from this machine but I don’t think I’ll develop on it very often. I have already been tripped up by not having particular programs and not knowing what to use instead. Konqueror is leaving a big gap in my life, I do use it a lot. I haven’t done much with fedora before, I’m sure yum is great but it isn’t aptitude. Also the weird “the default user logs in automatically, needs no password, and has instant sudo rights” setup makes me twitch. We tried turning off the sudo rights but bits of the desktop stopped showing up so I’ve left that as is.

There are some definite disappointments. The multi card reader claims to read XD cards – this is a big selling point for me as I have reason to be on the road with camera and laptop soon and I have a fujipix camera which takes an XD card. Well, XD cards do not work with the acer aspire ones so far as I can tell. We’ve dug through the drivers and it looks like it just isn’t set up to do it at all. I’m logged a support email with Acer but no response just yet. I bought the machine through PC World which seems to reduce the amount of support Acer gives, which is a bit disappointing as I didn’t know that before I did it (nobody else seemed to have supply, and they are local if entirely unfriendly. I know I don’t look like a proper geeky business user, but that doesn’t mean you can ignore or patronise me). The wireless won’t resume if it was turned on and the machine hibernates, you have to turn off the wireless before you do that, which seems like a little niggle but when you have lots of tabs active and you have to reboot to get your connection back … its really annoying.

All in all, I would usually have waited for a second generation machine but this is cute, it seems pretty robust, and withouth being very expensive it does everything I need. And at less than 1 kg, I can actually carry it without getting shorter in the process, which is more than I can say for my laptop! There is online evidence of people successfully getting proper ubuntu installations onto these machines and I’m very tempted by that idea.

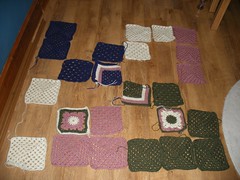
I have been busy installing the new toy, but I have also been busy making it a cosy!
finished product, outside finished product, inside

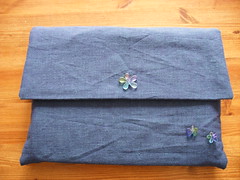
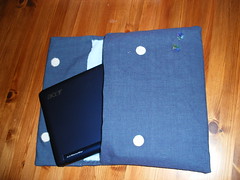
Its canvas on the outside, microfibre cloth on the inside (its really shiny and gets fingerprint-y, its good to have the soft inside) and it has rigid panels (made from a plastic placemat that got too close to me while I was feeling inspired). I made two simple envelope-type bags, put them inside one another, and stitched the lining into the outer. The fastenings are sticky dots of velcro (which I shoudl have sewn in because it doesn’t stick well to fabric, oops), and the beads are ones I’ve had in my stash for … more than ten years, scarily enough. They were just waiting for this project! I made the case to be a loose fit, knowing that I’ll try to get A5 paper in there as well as the machine itself as its sort of a convenient size!

Crochet Tutorial: Foundation Ring

Following on from the last lesson, where we did crochet chain with yarn and a hook, this week we use the chain to create the basis for our first project.

It’ll start to look like something after the next one, promise :)